
Self-hosted Tailscale with Headscale and Google login
One public host runs the Headscale control plane with a Let's Encrypt certificate, people log in with their Google account, and the same host serves its private network to every client. Every step is one key in tui-tailscale, previewed before it runs.
Every command on this page is the one
tui-tailscale v0.2.0
shows in its preview dialog, taken from its
README and its
source rather than written from memory. This is the path the README records as
run end to end on a real Ubuntu 24.04 host, with Google as the identity
provider and the host serving a subnet to its clients. The screenshots are the
tool’s own, rendered from --demo, so the names in them are the demo’s.
The names here are examples: vpn.example.com for the control plane,
192.0.2.10 for its public address, 10.0.0.0/16 for the network behind it,
and user@example.com for the person logging in.
What you end up with
Headscale is a self-hosted implementation of the Tailscale control plane: the server that knows who is on the tailnet, hands out addresses and tells nodes about each other. The Tailscale clients do not change; you point them at your server instead of Tailscale’s. At the end of this page:
https://vpn.example.comserves Headscale with a certificate from Let’s Encrypt, which Headscale fetches and renews itself;- a person joins by opening a login URL and signing in with Google, and only the accounts you listed get in;
- the same host is the first node, and it routes
10.0.0.0/16for every client that accepts routes.
tui-tailscale drives both ends: the headscale on this
host and the tailscale client. Its control-plane screens carry a readiness
line that names the first missing step and the key that does it, so if you lose
your place, the line tells you where you are.
Before the first key
You need a Linux host with a public address, a DNS name for it, and a Google account (a Google Workspace domain if you want to admit a whole domain).
Point an A record for vpn.example.com at 192.0.2.10. If your DNS provider
can proxy traffic (Cloudflare’s orange cloud, for instance), set the record to
DNS only. Headscale answers the Let’s Encrypt challenge on its own TLS port and
the clients speak the Tailscale protocol to it directly; a proxy in front
breaks both.
Install the tools from the family’s package repository. The repository is a one-time setup; then:
$ sudo apt install tui-tailscale tui-firewallRun sudo tui-tailscale, or run it as yourself with a warm sudo -v: reads of
the control plane and every change escalate through sudo -n, which never
prompts.
1. Install headscale (3, then i)
Switch to the users screen with 3. With no headscale on the host, the
readiness line reads
headscale is not installed · i installs it from the tui-tools repository, and
i previews exactly that. The package comes from pkgs.tui.tools, a source-built
mirror of the upstream release, signed and attested like every tool. If the
repository is not set up yet, the plan adds it first and checks the signing
key’s fingerprint against the pinned
767CFB337B01F32FFC073F3F389120B277E4FB44 before any repository file names it.
Then:
apt-get install -y headscaleThe package ships the binary, a hardened unit that runs as a headscale user,
and an example /etc/headscale/config.yaml. It leaves the unit stopped, because
there is nothing to serve until the next step.
2. Let’s Encrypt (S)
S on the users screen asks for the transport first, since the transport
decides what every later answer means. Pick Let’s Encrypt, then:
server_url:https://vpn.example.com. An IP address is refused here: Let’s Encrypt only issues for names.listen_addr:0.0.0.0:443, as proposed.- the challenge:
TLS-ALPN-01, the default. It is answered on port 443 itself, so port 80 can stay closed.HTTP-01is the other choice and needs port 80 reachable from the internet. acme_email: optional; Let’s Encrypt writes to it about expiring certificates.dns.base_domain: a private name such astailnet.internal. Nodes are named under it by MagicDNS, so it must not be a suffix ofvpn.example.com; Headscale refuses to start if it is, and so does this form.
The confirm dialog shows only the lines of config.yaml that change:
server_url, listen_addr, tls_letsencrypt_hostname (the URL’s host),
tls_letsencrypt_challenge_type and acme_email, with tls_cert_path and
tls_key_path emptied if the file had them. The file is not re-serialised: it
is parsed to find each key and spliced line by line, and a .bak copy is taken
first. The last confirm makes Headscale read it. A fresh package leaves the unit
disabled and stopped, so that step is:
systemctl enable --now headscale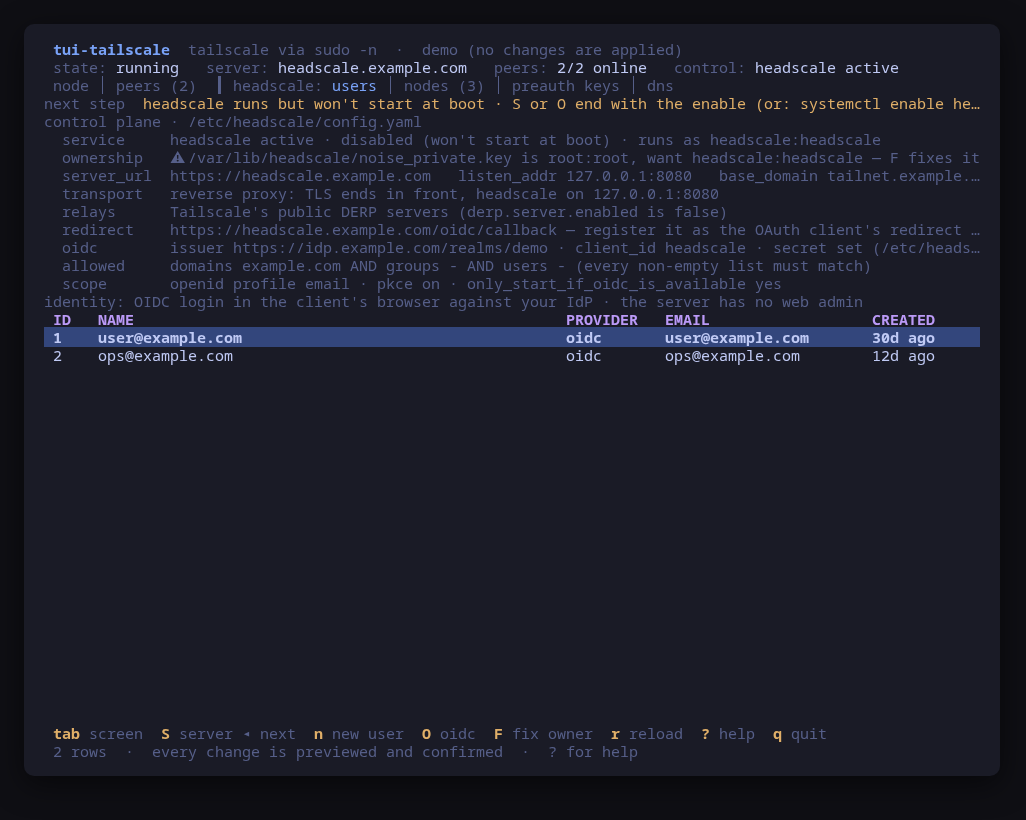
3. Open the ports (f)
With the unit running, the readiness line reads the host firewall. On a host
that blocks new connections it says so:
443/tcp is closed in the host firewall, followed by f opens tui-firewall.
The check reads tui-firewall --check when it is installed, or the nftables or
iptables ruleset otherwise, and it never changes anything. A rule it cannot
judge is reported as unknown, never as open.
Two ports matter:
443/tcp, the control port. Clients, browsers on the way back from Google, and Let’s Encrypt’s challenge all arrive here. With it closed, nothing on this page works.41641/udp, the port nodes use to reach each other directly. With it closed the tailnet still works, relayed through Tailscale’s DERP servers, and the readiness line says so rather than calling it a missing step.
f hands the terminal to tui-firewall, which drives
whichever firewall the host really runs. Add 443/tcp and 41641/udp as
allow rules; each is previewed as the exact command for that firewall. When
you quit tui-firewall, tui-tailscale comes back and reads the ports again.
On a cloud image whose firewall is a plain iptables ruleset ending in a REJECT, the rule has to go in front of that REJECT, and it has to be saved to survive a reboot. Opening ports on a cloud image’s iptables firewall walks through exactly that host. A cloud provider’s own network firewall (a security list, a security group) sits in front of the host and needs the same two ports opened in the provider’s console; tui-firewall cannot see it.
4. A Google OAuth client
In the Google Cloud console, pick or create a project and open Google Auth Platform.
The audience comes first, and it decides who can sign in at all:
- Internal is offered only to a Google Workspace organization, and admits only accounts in it. For a company tailnet this is the simple answer.
- External admits any Google account. Leave the app in Testing and add each person as a test user: only listed test users can sign in while it is in Testing, which is a second allow list on top of Headscale’s.
The data access step needs nothing beyond the three scopes Headscale asks for,
openid, email and profile. They are Google’s basic sign-in scopes and are
not sensitive.
Then create a client. The application type is Web application, and it needs one authorized redirect URI:
https://vpn.example.com/oidc/callbackThis is server_url plus /oidc/callback, character for character. The users
screen’s panel shows the same value next to whether an identity provider will
accept it, and Google will not accept plain http or a raw IP address, which is
why step 2 used a name. Keep the client ID and the client secret for the next
step.
5. The Google preset (O)
O on the users screen starts with a provider picker. Google’s preset fills
the issuer (https://accounts.google.com) and the default scope
(openid profile email). It also skips the groups step and empties
allowed_groups, because Google’s ID token carries no groups claim: any group
listed there would make Headscale refuse every login, including the people you
listed as users. The preset refuses to start at all while server_url is plain
http or an IP address.
Then the client ID, whose step repeats the redirect URI to register, and the client secret. The secret is typed masked and handled differently from everything else in the form:
- it goes to
/etc/headscale/oidc_client_secret, mode 600, owned by the account theheadscaleunit runs as, written byinstallfrom standard input, never on a command line; config.yamlgetsclient_secret_pathpointing at it, and never the secret;- no dialog, diff or status line ever shows it. The panel says
secret set, and that is the most the tool will ever say.
Then the allow lists, and here is the one rule worth reading twice: Headscale combines them with AND. A login gets in only if it matches every list that is not empty.
allowed_users: [user@example.com]on its own admits exactly that person.allowed_domains: [example.com]on its own admits every account in that Workspace domain.- Both together admit only the listed users who are also in the domain. An
address from another domain is refused even when
allowed_usersnames it, and the refusal on/oidc/callbackreadsunauthorised domain. The dialog warns when a user you typed is outside the domains, and when all lists are empty, which admits anyone Google authenticates.
Before writing, the tool fetches
https://accounts.google.com/.well-known/openid-configuration with curl from
this host, the machine that will have to reach Google, and reports what it
found. The confirm shows the oidc: lines that change, then the write of the
secret file, then systemctl restart headscale as its own confirm.
6. This host joins, and routes (1, i, then j)
Back on the node screen (1), i installs the Tailscale client from
Tailscale’s own package repository, the documented package-manager steps rather
than its curl | sh script. On Ubuntu that is Tailscale’s signing key and apt
source for the release’s codename, apt-get install -y tailscale, and
systemctl enable --now tailscaled.
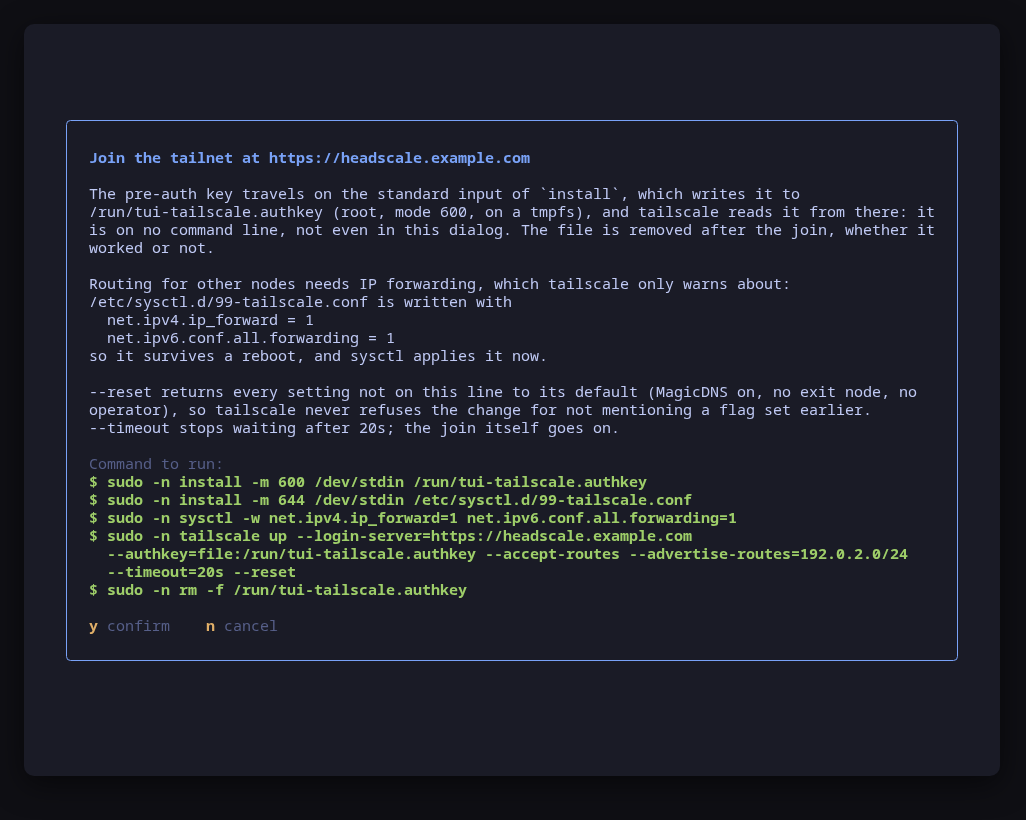
j asks six questions. The login server is prefilled with this host’s
server_url, because joining a host to its own control plane is the usual
first node. Leave the pre-auth key empty: this node logs in through Google.
Leave accept routes off here (this host is the router, not a client of it), and
advertise 10.0.0.0/16. Because the node will forward traffic for others, the
same preview turns IP forwarding on and keeps it on across reboots:
install -m 644 /dev/stdin /etc/sysctl.d/99-tailscale.conf
sysctl -w net.ipv4.ip_forward=1 net.ipv6.conf.all.forwarding=1
tailscale up --login-server=https://vpn.example.com --advertise-routes=10.0.0.0/16 --timeout=20s --reset
--reset returns every setting not on the line to its default, so tailscale
never refuses the change for a flag set earlier. --timeout=20s keeps the
screen responsive; the join itself goes on in tailscaled.
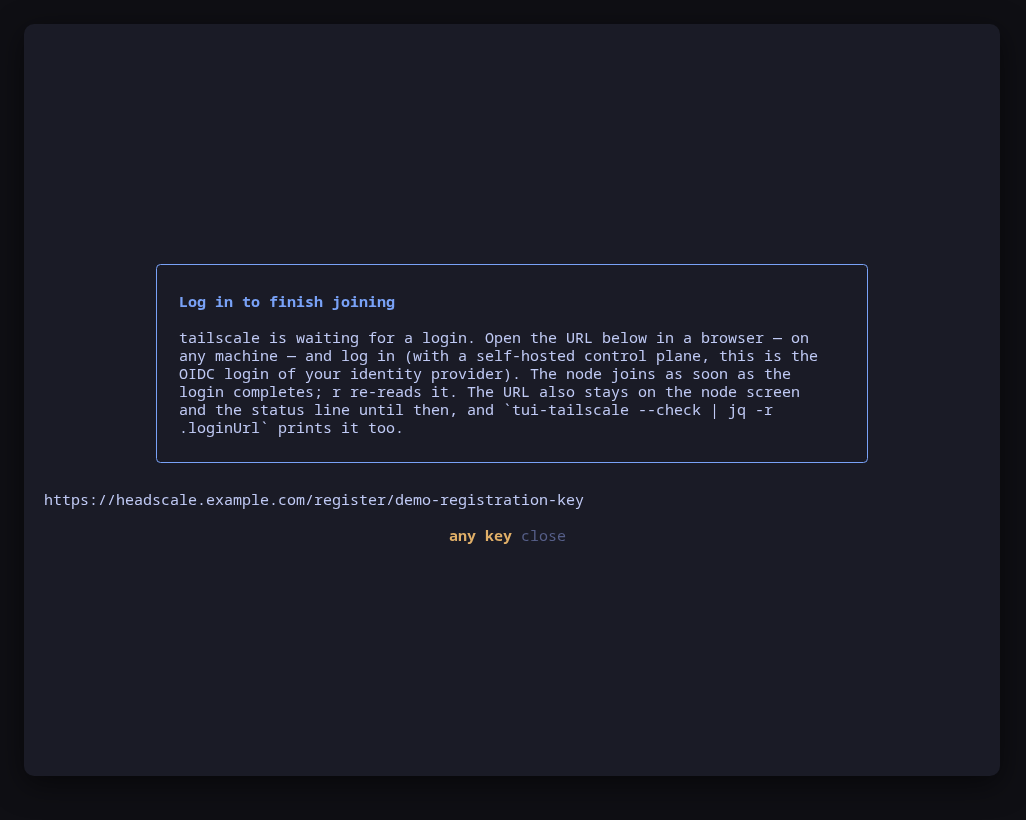
Without a key, tailscale prints a login URL. The tool shows it on a line of its
own, outside any frame, so a terminal selection copies the URL and nothing else.
Open it in any browser, on any machine, and sign in with a Google account the
allow lists admit. The node screen re-reads itself every few seconds while the
login is pending, and the status line turns into joined <tailnet> as <user>
when it completes. Headscale can take up to half a minute after the browser
confirms.
If nothing seems to happen, look at the nodes screen (4). A registration that
started and was not finished is listed there as waiting, with the URL that
finishes it, and R registers it as a user you pick, without a browser.
7. Approve the route (4, then r)
An advertised route does nothing until the control plane approves it. On the
nodes screen the ROUTES column shows 10.0.0.0/16 pending, and the readiness
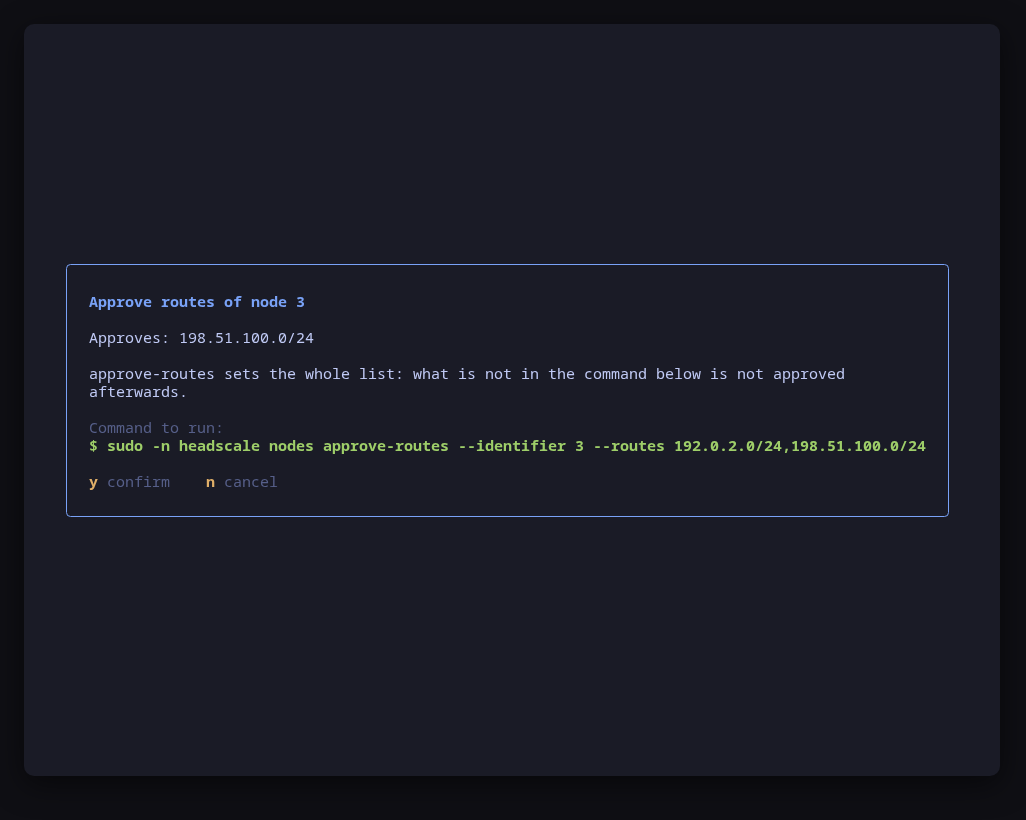
line reads routes pending approval (1). Select this host and press r: the
list is prefilled with what it advertises, so approving it is one keystroke.
headscale nodes approve-routes --identifier 1 --routes 10.0.0.0/16The list replaces the node’s approvals, because that is what the command does. Taking an entry out revokes it, and a revocation opens as a danger dialog.
8. The clients
On every other machine, install Tailscale the usual way and join with routes
accepted, so it reaches 10.0.0.0/16 through this host:
$ sudo tailscale up --login-server=https://vpn.example.com --accept-routesIt prints a login URL; open it, sign in with Google, done. A client that
already runs tui-tailscale does the same with j and a yes to accept routes,
and can save the answers as a join profile
for the next time.
Ready
With a node registered and every route approved, the readiness line on the control-plane screens reads:
ready · clients can log in and every advertised route is approvedIf 41641/udp is still closed, the same line adds that peers relay through
DERP instead of connecting directly, and that f opens tui-firewall. Scripts
get the same answer without the screens:
$ sudo tui-tailscale --check | jq .headscale.readiness--check prints each step as a boolean, next naming the first missing one,
and nextStep as the sentence. It prints no server URL, address or node name:
the OIDC issuer is reduced to its host name, and the allow lists are counted,
because they name people.
Every screen on this page also runs against a fake tailnet, with nothing installed and nothing changed:
$ tui-tailscale --demoRelated guides
- A private tailnet with your own CA: the same control plane with no public DNS name, a certificate from a local CA, and pre-auth keys instead of Google.
- Opening ports on a cloud image’s iptables firewall: step 3 on a cloud image whose INPUT chain ends in a REJECT.
- A local CA with tui-cert: certificates for names and addresses Let’s Encrypt will not issue for.